Refreshing Data in Amazon QuickSight
Overview
This document covers how Amazon QuickSight refreshes data, the differences between direct queries and SPICE datasets, and various approaches to refreshing SPICE data.
Direct Query Connections
When Amazon QuickSight connects to a data store using a direct query, the data automatically refresh when opening an associated dataset, analysis, or dashboard. Filter controls refresh automatically every 24 hours.
SPICE Datasets
Refreshing SPICE datasets requires QuickSight to independently authenticate using stored credentials to connect to the data. Manually uploaded data cannot be refreshed by QuickSight, even if it is stored in SPICE. To automatically refresh data stored in an S3 bucket, create a dataset using the S3 data source card.
Refreshing Manually Uploaded Files
To refresh manually uploaded files in SPICE, import the file again. If reusing the original dataset name, rename or delete the original dataset and apply the preferred name to the new dataset. Ensure the field names and data types are the same. Open the analysis and replace the original dataset with the new one.
Refreshing SPICE Data
SPICE datasets can be refreshed at any time to include changes since the last import. Amazon QuickSight Standard Edition allows full refreshes, while Enterprise Edition supports full and incremental refreshes (for SQL-based data sources only).
Methods to Refresh SPICE Data
- Use options on the Datasets page.
- Refresh a dataset while editing.
- Schedule refreshes in dataset settings.
- Use the CreateIngestion API operation.
Enable email notifications about data loading status to inform dataset owners if data fails to load or refresh. This option is available on the Finish data set creation screen and is not available for datasets created using the “Upload a File” option on the datasets page.
Importing Data into SPICE
When creating or editing a dataset, choose to use SPICE or a direct query, unless the dataset contains uploaded files. Importing (or ingesting) data into SPICE can save time and money by improving query processing speed, reducing wait times, and allowing for data reuse without incurring additional costs.
SPICE capacity is allocated separately for each AWS Region and shared by all QuickSight users in a single region. Administrators can purchase or release SPICE capacity as needed.
Refreshing SPICE Data
Refreshing a Dataset
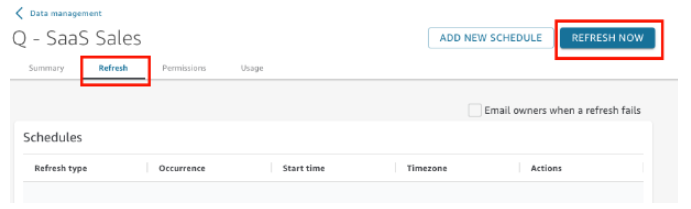
Follow the provided procedure to refresh a SPICE dataset based on an Amazon S3 or database data source on the Datasets page.
- On the Datasets page, choose the dataset to open it.
- On the dataset details page that opens, choose the Refresh tab and then choose Refresh now.
3. Keep the refresh type as Full refresh.
For Amazon S3 datasets:
- To use the same manifest file you last provided to Amazon QuickSight, choose Existing Manifest.
- To specify a new manifest file by uploading it from your local network, choose Upload Manifest, and then choose Upload manifest file.
- To specify a new manifest file by providing a URL, enter the URL of the manifest in the Input manifest URL.
4. Choose Refresh.
For Amazon S3 datasets, choose OK, then OK again.
For database datasets, choose OK.
Using SPICE Data in an Analysis
A data import indicator appears next to the dataset list at the top of the Fields list pane when using stored data in an analysis. It shows the percentage of rows successfully imported and a message with counts of imported and skipped rows.
Viewing SPICE Ingestion History
Check the SPICE ingestion history for datasets to view the date and time of the latest ingestion, its status, and other related information.
Troubleshooting Skipped Row Errors
Amazon QuickSight skips rows it cannot interpret during data import. Errors can be caused by data type inconsistencies, incorrectly processed headers, data exceeding quotas, data incompatibility with supported types and values, and calculated fields containing incompatible data.
- Ensure consistency between field data type and field data.
- Make sure the imported file is processed correctly with or without a header.
- Ensure data doesn’t exceed Data source quotas.
- Make sure data is compatible with Supported data types and values.
- Verify calculated fields contain compatible data with the calculation.
To fix issues, edit the dataset, and resolve errors. Import the data again and repeat the process until all errors are resolved.