Git Installation
Git Installation on Windows
- Visit the official Git website: https://git-scm.com/downloads
- Allow the download for Windows to complete by clicking the download link.

Install Git by extracting and running it
3. Go to the download location (or use your browser’s download shortcut). Double-click the file to install it.
4. Click Yes on the User Account Control dialog that opens to allow the app to make changes.

5. Click Next when you’re ready to install GNU General Public License.

6. Leave the default installation location, unless you need to change it, and click Next.

7. You will see a component selection screen. Click Next unless you have a specific reason to change the defaults.

8. Click Next to create a start menu folder.

9. Use the drop-down menu to select Notepad++ (or whatever text editor you like) and click Next.

10. Click Next and choose a name for your initial branch. The default is master. If you’re on a team that needs a different name, leave it at that.

11. When you run a command from the command line, the PATH environment is the default set of directories included. Click Next and leave this in the middle (recommended).

Certificates, line endings, and terminal emulators
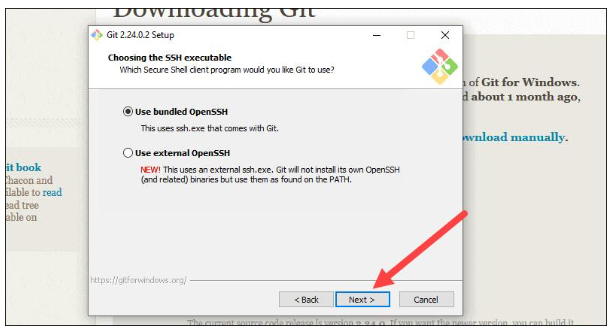
12. Git already comes with its own SSH client, so just click Next if you don’t need one.
13. Click Next to proceed. You might need Windows Store certificates if you’re working in an Active Directory environment.

14. Click Next to convert line endings. Changes to this option may cause problems with the way data is formatted.

15. Click Next to choose a terminal emulator. MinTTY is recommended for its features.

16. If you don’t specifically need to change the behavior of the git pull command, click Next to continue.

17. Next, choose a credential helper. Git uses credential helpers to fetch or save credentials.

Customization options
18. This step lets you choose which extra options you want to enable. If you want symbolic links, which are like shortcuts for the command line, check the box.

19. Git may offer to install experimental features depending on the version you’re installing. This article was written when pseudo controls were available and a file system monitor was available. Unless you’re feeling adventurous, leave them unchecked and click Install.

The complete Git installation process
20. Click Finish to view the Release Notes and launch Git Bash once the installation is complete.

Windows Git Launcher
There’s a bash scripting shell (or command line) and a graphical user interface (GUI).
Launch Git Bash Shell
Go to the Windows Start menu, type git bash, then press Enter (or click the icon).

Git GUI launch
Launch Git GUI from the Windows Start menu by typing git gui and hitting Enter (or clicking the icon).

Git Installation for Linux (Ubuntu) 
1.Run the following command in a terminal window (Ctrl+Alt+T) to update the system package index:
sudo apt updateThe package index ensures that you are working with the latest versions of software.

2. Using the default Ubuntu repository, install Git:
sudo apt install git
Install by pressing y(yes).

Let the process run its course.
3. Run the following commands to verify the installation and version:
git --version
If the program has been installed correctly, the output shows the version.